I’ve got a modest little dream: turning my aging Yoga Slim 7 into a local AI workhorse instead of burning money every month on Cursor, Mistral and Codex. On paper it’s not exactly a beast — 11th-gen Intel Core i7-1165G7, 16 GB of RAM, integrated graphics and a fan that panics as soon as Chrome opens three tabs. But I don’t have 2-4k € to drop on a shiny MacBook Pro with M-whatever and unified RAM, so for fun… we try anyway.
Enter llmfit, a small Rust tool that answers the one question every dev asks before downloading yet another 30 GB model: “Will this even run on my machine?”
Table of Content
- What llmfit actually does
- Installing llmfit
- Common “WTF” moments (and fixes)
- TUI: your AI compatibility dashboard
- Providers and runtimes
- Use cases, caps and filters
- Beyond TUI: CLI, dashboard and API
- So… and my poor Yoga Slim 7?
What llmfit actually does
llmfit is a terminal tool (CLI + TUI) that scans your hardware (RAM, CPU, GPU/VRAM, accelerators) and cross-checks it against a curated database of hundreds of LLMs from dozens of providers. For each model it computes scores for fit, speed, quality and context, then ranks what makes sense for your specific machine instead of leaving you to guess from “7B / 14B / 70B”.
Think of it as a pcpartpicker for local LLMs: instead of assembling a PC from parts, you assemble a stack model + quantization + backend that your laptop can actually handle.
Installing llmfit
Good news: installation is the easy part. You’ve got several options depending on your OS and how allergic you are to package managers.
Quick install (Linux/macOS, recommended)
For a fast one-liner:
curl -fsSL https://llmfit.axjns.dev/install.sh | sh
# or to install locally in your user space:
curl -fsSL https://llmfit.axjns.dev/install.sh | sh -s -- --local
This script pulls the latest binary for your platform and adds it to your PATH.
Homebrew (macOS / Linux)
If you live in brew:
brew install llmfitHomebrew handles updates for you like any other formula.
Windows (Scoop)
On Windows, llmfit is available via Scoop:
scoop install llmfitIf Scoop isn’t installed yet, you’ll need first :
Set-ExecutionPolicy -ExecutionPolicy RemoteSigned -Scope CurrentUser
Invoke-RestMethod -Uri https://get.scoop.sh | Invoke-Expression
scoop install llmfit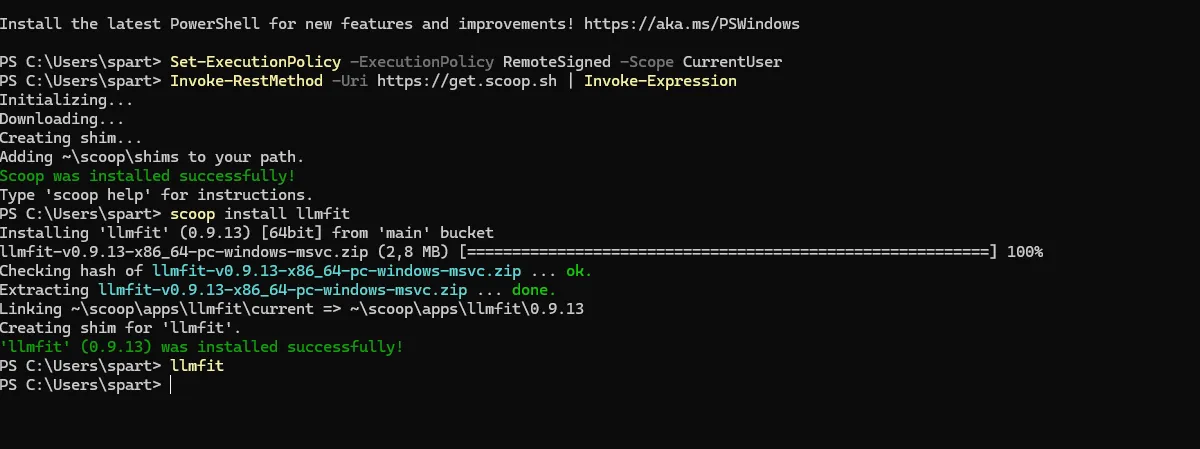
From source (Rust devs)
If you already have a Rust toolchain:
git clone https://github.com/AlexsJones/llmfit.git
cd llmfit
cargo build --release
This drops the compiled binary under target/release/llmfit.
Once installed, test it with:
llmfitThis launches the TUI and kicks off a hardware scan.

Common “WTF” moments (and fixes)
Even on a simple tool, a couple of things can bite you. Here are three issues I’ve seen users hit, and how to fix them.
1. “Ollama: ✗” or downloads not working
llmfit integrates with Ollama to list and download models, but only if the Ollama daemon is running.
If you see Ollama: ✗ in the TUI status bar or downloads silently fail, it usually means the API at http://localhost:11434 isn’t reachable.
Fix:
# Start Ollama
ollama serve
# then relaunch
llmfit
If Ollama runs on another machine or a non-default port, set:
OLLAMA_HOST="http://192.168.1.100:11434" llmfitllmfit will then probe that host instead of localhost.
2. Model installed, but llmfit doesn’t see it (e.g. Gemma, etc.)
Some users reported that a model they know is installed (for example via Ollama or a GGUF file) doesn’t show up as “Installed” in the llmfit TUI. In one case, a user had a Gemma 3 model ready to go but llmfit’s database didn’t recognize it, so it looked like nothing was installed.
Fix checklist:
- Hit
rin the TUI to refresh installed models; this re-scans Ollama, llama.cpp and MLX caches. - Make sure the model name matches one of llmfit’s known database entries; very new or niche models may not be indexed yet.
- If it’s a GGUF, confirm it lives under
~/.cache/llama.cpp/models/so llama.cpp integration can detect it.
Worst case: the model is just newer than the bundled database. Updating llmfit to the latest release usually helps.
3. “llama.cpp is not supported” or not detected
llmfit can talk to llama.cpp to detect cached GGUF models and even download new ones, but only if the llama.cpp CLI tools are available in PATH.
There is an open issue from users seeing messages around llama.cpp not being supported or detected, typically on setups where the binary isn’t installed system-wide.
Fix:
# macOS
brew install llama.cpp

# or from source
git clone https://github.com/ggml-org/llama.cpp
cd llama.cpp
cmake -B build && cmake --build build --config Release
Then ensure llama-cli or llama-server is in your PATH and restart llmfit so it can find them.
TUI: your AI compatibility dashboard
By default, llmfit launches an interactive TUI that feels like a retro terminal dashboard, but actually usable.
It shows a table of models with columns for provider, parameters, fit score, speed, quality, context and install status.
You can:
- Scroll with
j/k,PgUp/PgDn, go top/bottom withg/G - Search models with
/ - Toggle filters and sorting with keys like
f,a,s - Mark models and compare them side by side with
m,candx
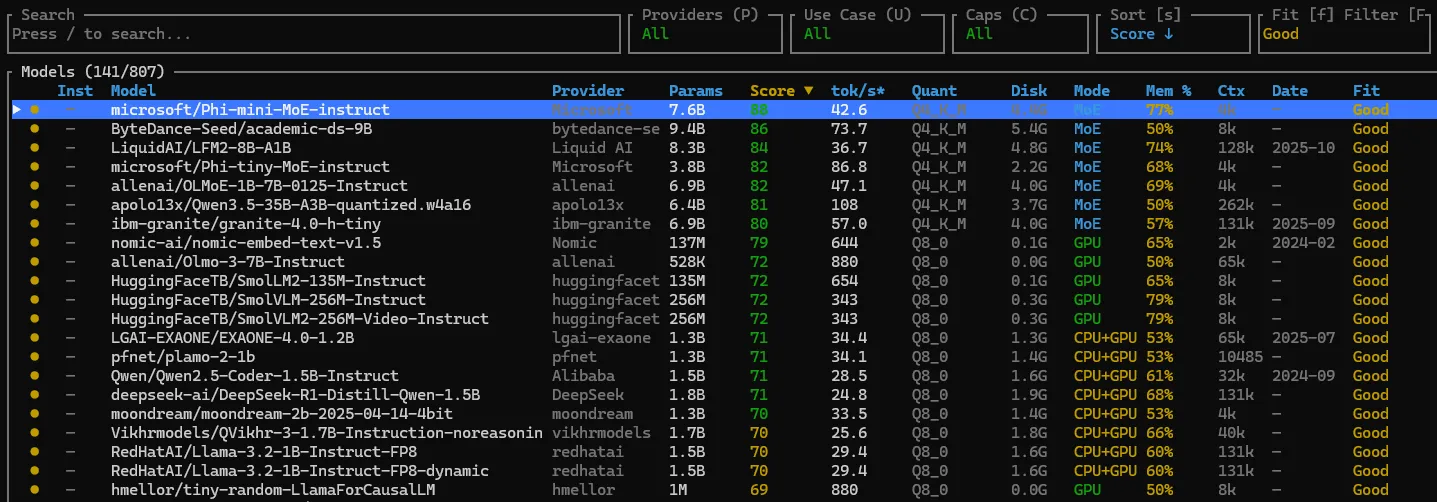
Themes are built in: hit t to cycle color schemes; llmfit remembers your choice automatically.
Providers and runtimes
Under the hood, llmfit isn’t a runtime itself; it plugs into existing local backends:
- Ollama (Linux, macOS, Windows) — detects installed tags via
/api/tagsand can trigger downloads with/api/pull. - llama.cpp — looks at GGUF files in
~/.cache/llama.cpp/models/and selects quantizations that match your memory budget. - MLX (Apple Silicon only) — for
mlx-communitymodels optimized for M-series chips.
For each model llmfit knows which providers can serve it and shows small indicators like O, L, OL or ✓ in the “Inst” column.
Pressing d opens a provider picker when multiple backends are available, or auto-selects the best one if there’s an obvious choice.
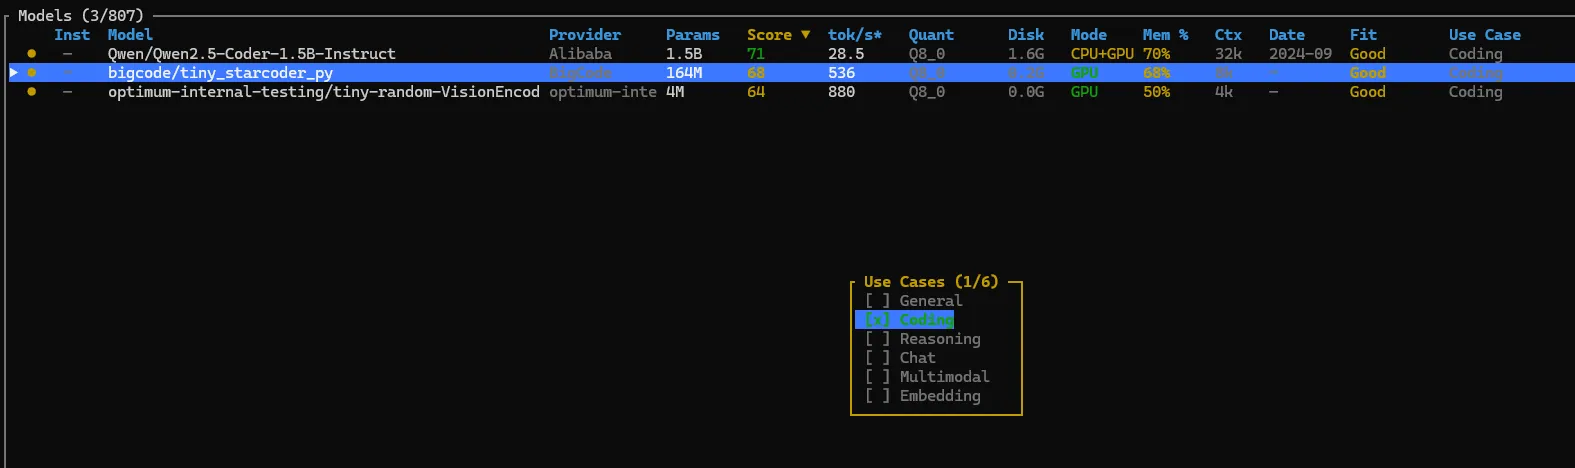
Use cases, caps and filters
llmfit isn’t just “here’s a random model list”. It understands use cases and caps so you can filter based on what you actually want to do.
You can:
- Filter by use case (general, coding, reasoning, chat, multimodal, embeddings) from the TUI, for example with a key like
U. - Cap the context length for estimations with flags such as
--max-context 4096or--max-context 8192to reflect your typical workload. - Override the memory budget with
--memory=24Gor similar to simulate an external GPU or slightly optimistic VRAM.
On top of that, JSON output (--json) lets you feed recommendations straight into scripts or CI pipelines.
Screenshot placeholder: TUI with a use-case filter applied (coding) and context/memory info visible
Beyond TUI: CLI, dashboard and API
If you’re allergic to UIs, there’s a straight CLI mode:
llmfit --cli
llmfit recommend --use-case coding --limit 5
llmfit fit --perfect -n 5
This prints tables or JSON summaries right in your terminal.
For browser people, llmfit launches a web dashboard accessible on http://127.0.0.1:8787 where you can explore recommendations visually without staying in the terminal.
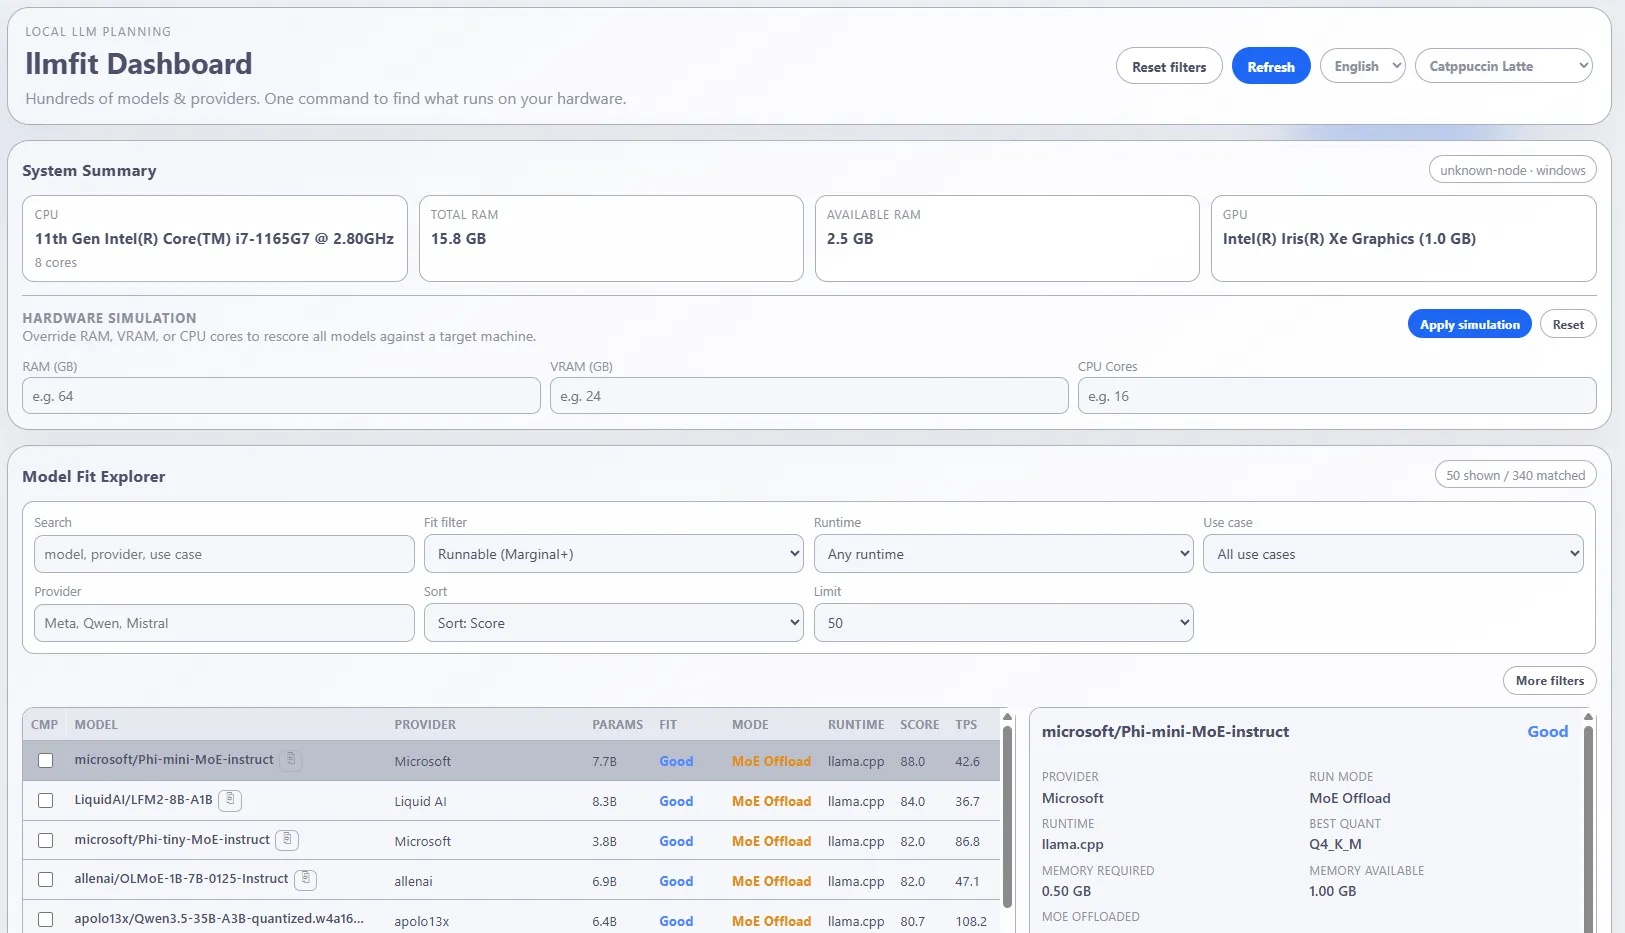
And if you want to integrate this into your own tools, llmfit exposes a REST API with endpoints like /api/v1/system and /api/v1/models/top.
So… and my poor Yoga Slim 7?
On my 11th-gen i7 with 16 GB of RAM and zero discrete GPU, llmfit is brutally honest. It’s not going to recommend a 70B reasoning monster, but it will surface smaller, quantized models (think 4-8B Q4) that actually fit in memory and can serve as a local coding buddy without setting the laptop on fire.
And that’s the real win: instead of wasting an evening downloading the wrong model, I get a clear “this fits / this maybe / this don’t even try” for my exact hardware profile.
Until I can afford that dream machine with way too many GPU cores and unified memory, llmfit is basically my financial advisor: “Calm down, champ, your Yoga can still do stuff — just not that stuff.”